
This page gives you a logical overview of the Leadline platform and how it fits within your HR tech stack. Throughout the overview, there are references to other pages in the Knowledge Hub that go into more detail on the subject.
Core Services in the Leadline platform
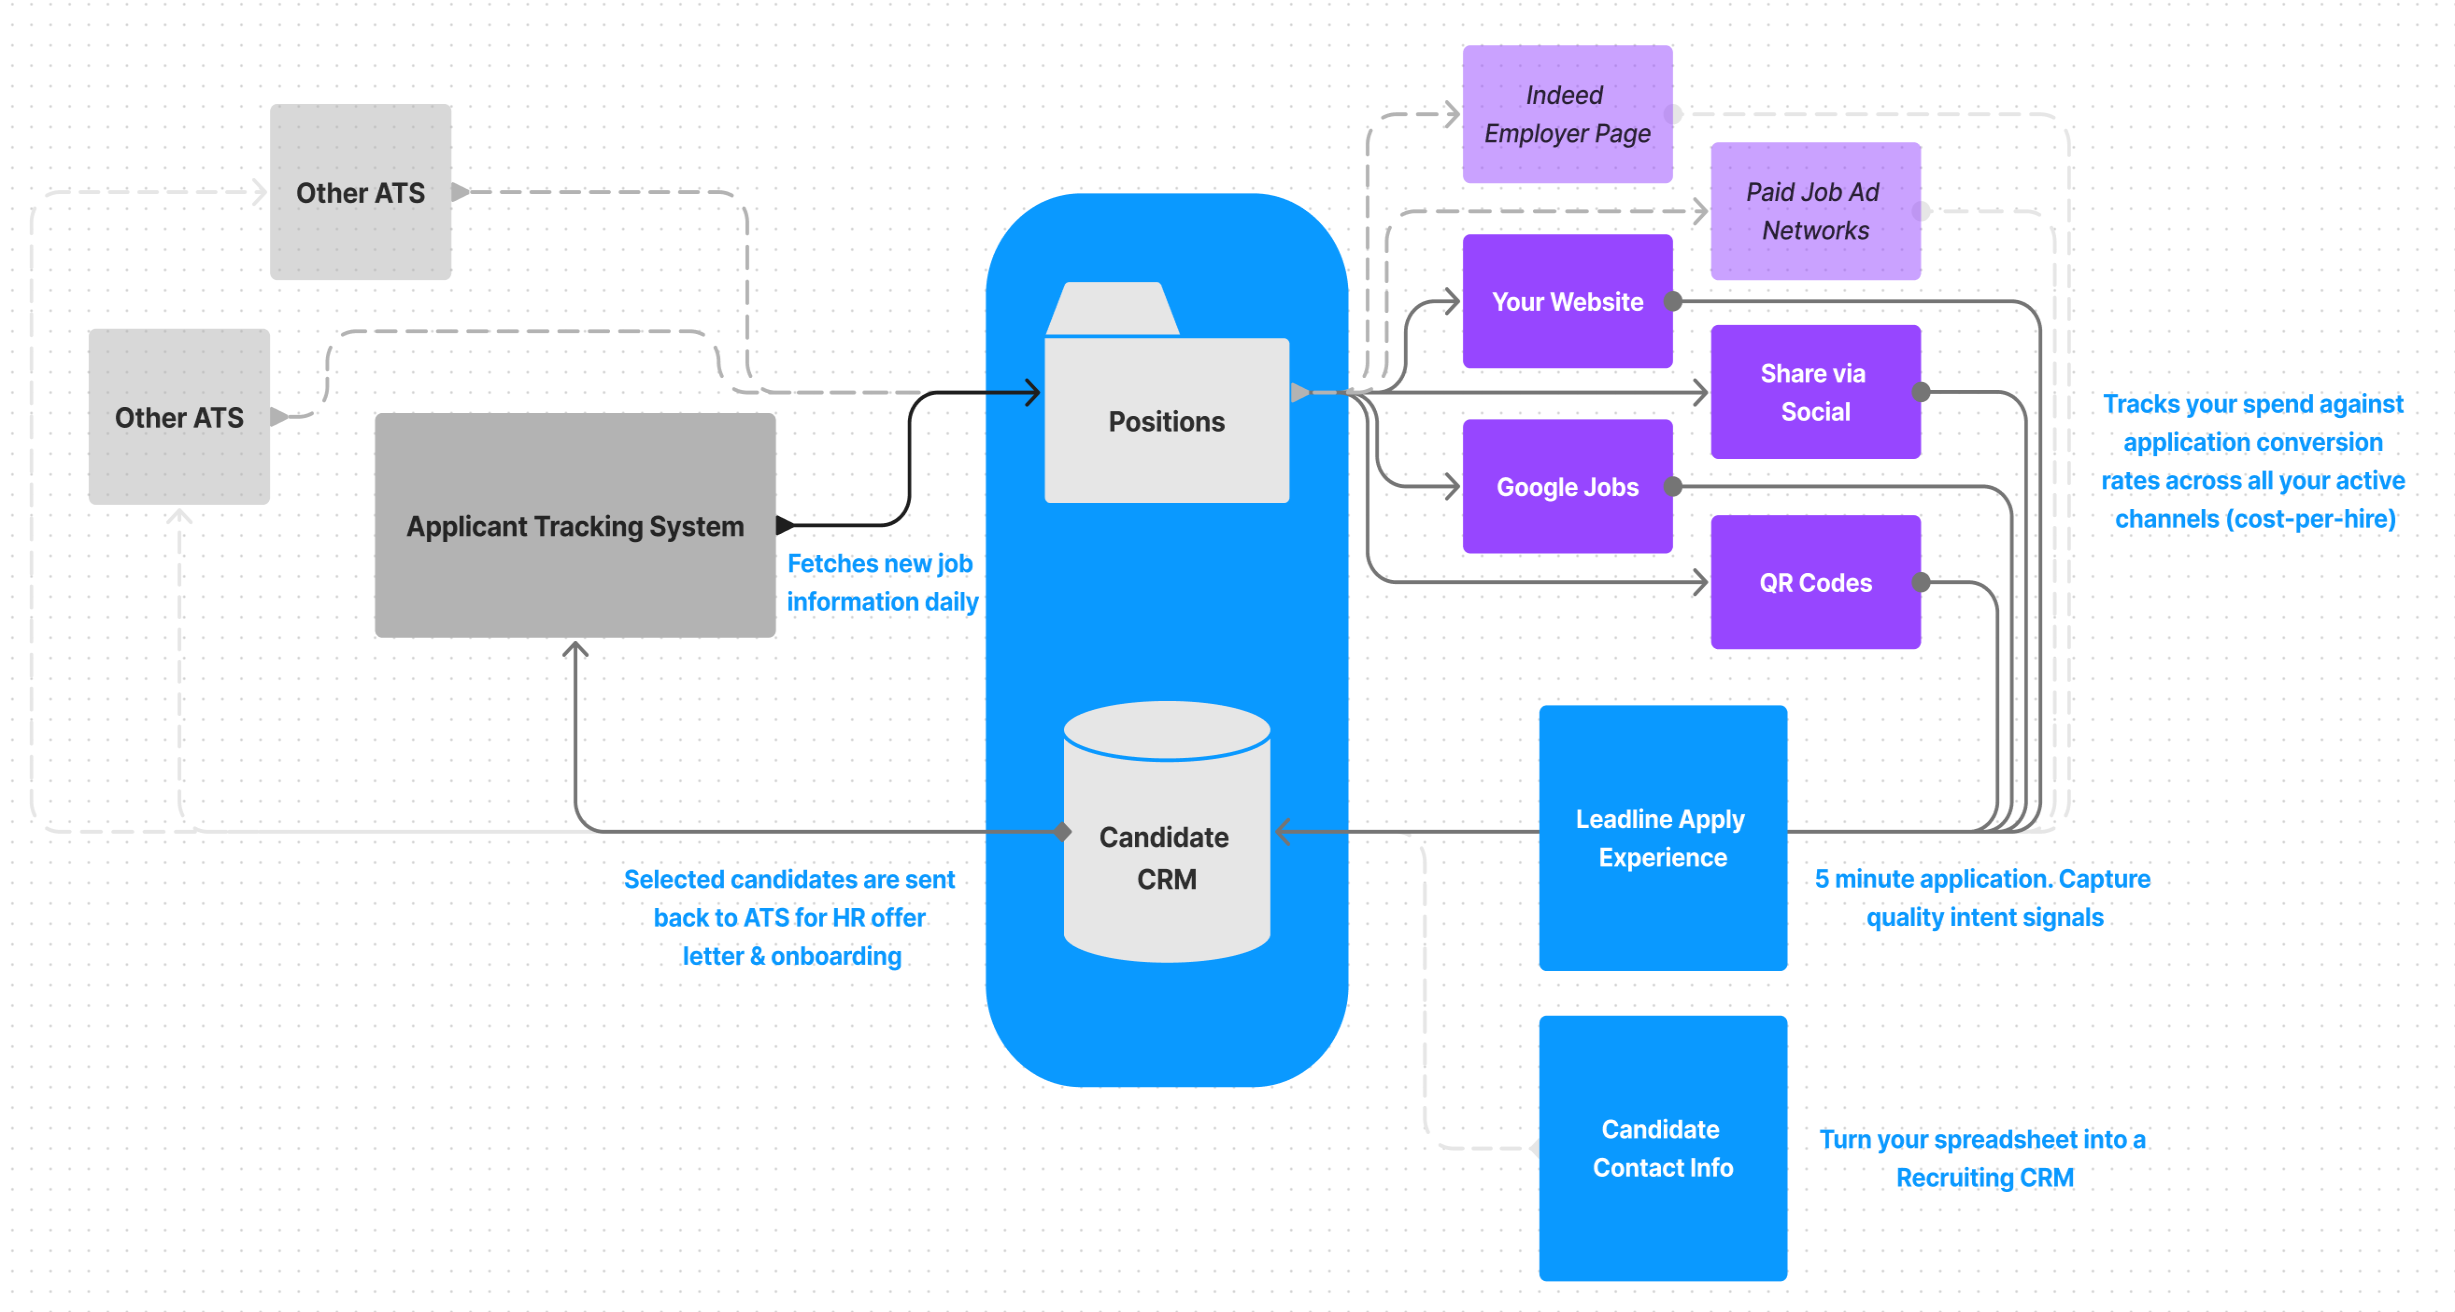
The Leadline platform has two primary services which facilitate most of your use of the product.
The first is what we call the Positions service. The Positions service manages your job requisitions, plus all the nuanced workflows and processes that often occur in larger, complex organizations. Leadline’s Position service offers teams a flexible way to source candidates across different channels, while ensuring a standard HR process is maintained on the back-end when it’s time to convert a candidate from Leadline into an employee in your HR system of record.
The second core service in the Leadline platform is the Candidates service. This service acts like a Candidate Relationship Manager (CRM), managing the database of everyone who might be interested in working with you. Instead of managing a spreadsheet of static data, Leadline automatically logs activity between candidates and your recruiting teams, so you maintain a company-wide view of your team’s recruiting efforts.
Getting Started: the Positions service
To recap, the Positions service manages your job requisition process. As a pre-requisite, you will obviously need to feed it information about your jobs. In Leadline, there are two ways to add job data to the system:
Manually, using the recruiter portal interface
Programmatically, using Leadline’s Applicant Tracking System (ATS) Integration feature
In addition to the basic job data like title, description, and location, you also need to setup the rules & workflows associated with each job.
Some examples of common rules & workflows:
Configuring which channels the job will be advertised to
Configuring what information should be collected when candidates submit an application for the job
Limiting job management to specific users
Setting up job-specific tracking links to measure ad channel performance
The Positions service maintains all the links to your individual job postings in Leadline. Each job has its own set of unique links, which makes it really easy to direct people to a specific job in just one-click - but more importantly it also allows Leadline to measure job-specific performance across channels for you, which is often lost when companies try to standardize their process by directing every applicant to apply directly through your website.
Leadline automatically provisions some links for each of your jobs, but your team can easily create custom links for more detailed insights. These links (which look something like jobs.leadline.io/1234) can be shared just like any other copy/paste link-sharing experience. Even if you have 10 tracking links for a single job, the Positions service will ensure the candidate experience is uniform across each of those job links.
< GIF of copy/pasting channel link into an Indeed post, a LinkedIn post, a text message referral, and an Instagram post >
Getting Started: the Candidates service
The Candidate service manages all the information in your Candidate CRM. Broadly speaking, there are three types of data managed in the Candidate service:
Basic contact information (name, email, phone number)
Profile information (job-seeker status, current employer, tags, links, and files)
Activity logs (a history of events like when a candidate submits an application for a job, when automated text messages are sent to the candidate, or when a meeting is scheduled through the system, etc.)

Security Tip
Leadline encrypts data using industry-standard HTTPS/TLS protocol. Only users with an active account in your company with the appropriate permission levels can see it.
Reminder
As a reminder, Leadline is meant to manage your candidate data, not employee data. Employee-related data should be stored and managed in your HRIS system. Please see this page for more details
There are three ways candidates can be added in Leadline:
Manually, using the recruiter portal interface
Imported, using a .csv file
Automatically, whenever a candidate starts or submits an application to a specific job powered by Leadline
Using a combination of tags and statuses, you can create dynamic filters for easily finding candidates in your database. Check out our guide on how to use tags in Leadline if you aren’t super familiar with creating search queries in CRMs.
Leadline tracks which jobs candidates apply to, but you can also add a candidate from your CRM directly to a specific job. This allows you to quickly make the most out of candidates who might not get the job they initially applied to, but are good candidates for another job in your company and you don’t want to lose them.
If you are using an integrated ATS, you can also setup integration workflow rules to push candidates into your ATS where you can get them into the offer letter stage. As a bonus, if your ATS supports the function - Leadline will even track updates to that application made within the ATS for more uniform company reporting.
Next section: Setting up your first positions in Leadline
Looking for more training? Check out the next section where we walk you through how to configure the positions service for your first few jobs. Between this section and the next section, you should have everything you need to get a basic setup up-and-running quickly with Leadline.
Training Checklist
Here is a list of 10 tasks you can try out to learn the Leadline system:
Create a candidate manually, using the recruiting portal interface
Import this sample .csv spreadsheet file of 10 candidates to your CRM
Create and publish your first position in Leadline
Log-in to Leadline on your mobile device (portal.leadline.io)
Create a candidate by applying to one of your positions
On your mobile device, review and advance/reject a new candidate submission
Create a second position, using 5 additional questions and a new Page template
Make a team member or Leadline customer success manager an authorized user of your second position
Add the candidate from task #5 to your second position through the ‘invite to apply’ email or manually using the portal interface